
Windows 11 is now the only desktop Windows that Microsoft still supports, since Windows 10 reached its end of support on October 14, 2025. Even so, plenty of users prefer Windows 10 for its familiar interface, older driver support, or compatibility with legacy software. This guide covers both ways to downgrade from Windows 11 to Windows 10 in 2026, and what you should know before you start.
What to Know Before Downgrading
Downgrading is only free and easy within a short window after upgrading. Microsoft keeps the previous Windows installation on your drive for 10 days after the upgrade, and that is the only period where the built-in rollback option works. After those 10 days, the old files are deleted and a clean install is the only path back.
There is one important catch in 2026: Windows 10 no longer receives security updates or bug fixes. Downgrading means giving up patches for new vulnerabilities, so only do it if you understand the risk. If your reason for downgrading is an app or driver problem, check our Windows 11 cheat sheet first, since many issues have simple fixes that keep you on a supported system.
Method 1: Roll Back Through Settings (Within 10 Days)
This is the easiest method, but it only works within 10 days of installing or upgrading to Windows 11. It keeps your files and most of your settings intact, so no backup or reinstall is required.
Step 1. Press Win + I to open Settings, then select System from the left sidebar.
Step 2. Click Recovery from the list of system options.
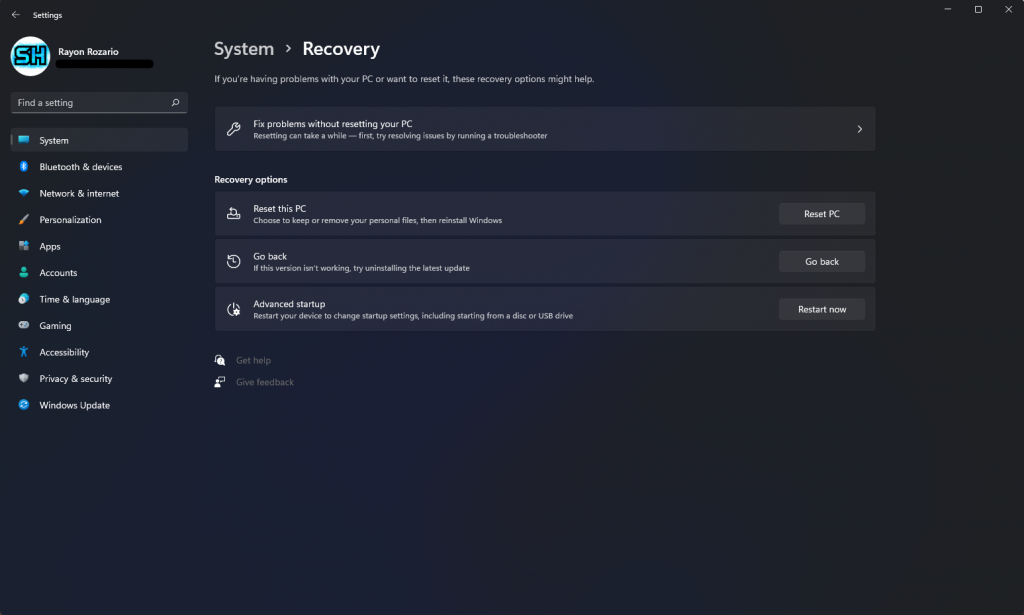
Step 3. Under Recovery options, find Previous version of Windows and click the Go back button. If this option is greyed out or missing, the 10 day window has already passed and you need Method 2.
Step 4. Windows will ask why you are going back. Select a reason, click Next, and choose No, thanks when it offers to check for updates.
Step 5. Read the final warning, then click Go back to earlier build. The PC restarts and the rollback runs automatically, which can take up to an hour depending on your hardware.
How to Extend the 10 Day Rollback Window
If you are still inside the 10 day window but want more time to decide, you can extend it with a simple command. Open Command Prompt as administrator and run the following, replacing 30 with the number of days you want:
DISM /Online /Set-OSUninstallWindow /Value:30
Run this before the original window expires, because once Windows deletes the previous installation, the rollback data is gone for good. You can check the current window size with DISM /Online /Get-OSUninstallWindow.
Method 2: Do a Clean Install of Windows 10
When the 10 day window has passed, or if you are moving from a PC that came with Windows 11 preinstalled, a clean install is the only reliable option. This wipes the drive, so back up everything important before you begin.
Step 1. Go to the Windows 10 download page on Microsoft’s website.
Step 2. Scroll down to Create Windows 10 installation media and download the Media Creation Tool.
Step 3. Open the tool, accept the license terms, and choose Create installation media for another PC. Pick your language and edition, then choose a USB flash drive or an ISO file.
Step 4. Once the media is ready, boot your PC from the USB drive and follow the Windows 10 setup wizard. Select Custom: Install Windows only, delete the Windows partitions if you want a completely fresh start, and install onto the unallocated space.
Step 5. Complete the out-of-box setup with your Microsoft account, then run Windows Update to install the latest drivers and patches. A Windows 11 digital license linked to your Microsoft account usually activates Windows 10 automatically on the same hardware; if not, our guide on activating Windows 10 using Command Prompt walks you through the alternatives.
After You Are Back on Windows 10
Once Windows 10 is running, reinstall your essential apps and check that your drivers are up to date through Windows Update or the manufacturer’s site. If you game on this PC, our Windows 10 optimization tips for gaming will help you squeeze out more performance.
If you later decide to come back, Windows 11 still offers a free upgrade path on eligible hardware. Our list of the 14 must-have apps for Windows 11 makes it easy to set up a fresh install the way you like it.
Frequently Asked Questions
Can I downgrade from Windows 11 to Windows 10 for free?
Yes. The Settings rollback is free if you act within 10 days of upgrading, and a clean install also works without paying for a new license because your Windows license is tied to your hardware or Microsoft account.
Will I lose my files when downgrading?
The Settings rollback keeps your personal files and most settings. A clean install erases everything on the selected drive, so back up your data first if you go that route.
Is it safe to use Windows 10 after downgrading?
Windows 10 stopped receiving security updates on October 14, 2025. You can still use it, but it will not get fixes for new vulnerabilities, so it is riskier than Windows 11 for everyday browsing and online accounts.
How long does a Windows 11 to Windows 10 downgrade take?
The Settings rollback usually takes 30 to 60 minutes. A clean install takes about 20 to 30 minutes for the setup itself, plus extra time to reinstall apps and restore your files.