
A clean installation of Windows 10 is what many people prefer when something is wrong with their computer. It is the best way to get rid of problems such as memory, viruses, performance, and battery issues. In this article lets see the process of how to install Windows 10.
Take a backup
A clean installation of windows is going to erase everything on your drive in which your operating system is. To make sure that essential files are not lost in the process we need to back them up safely.
Uploading Files to a Cloud Storage
Windows provides you with the option to upload all your important files to OneDrive. However, if you do not have fast internet then you’d rather use the next method.
Click on the OneDrive icon in the taskbar. Drag all the important folders into OneDrive to back them up.
Copying files to an external drive
Copying files to an external device is the best method of backing up data. The most important folders to back up is the Desktop, Documents, Videos, and Downloads. Take a screenshot of all the applications you have in case you want to reinstall them later.
Minimum Requirements
If your computer can already handle windows 10 then there is no need for you to worry. However, if you plan to install this on a computer with older hardware then you might want to check if it satisfies the minimum requirements.
Below are the minimum requirements for Windows 10
- Processor: 1GHz or System on a Chip (SoC)
- Memory: 1GB for 32-bit or 2GB for 64-bit
- Storage: 32GB for 64-bit or 32-bit
- Graphics card: DirectX 9 or later with WDDM 1.0 driver
- Display: 800×600
Download Windows
To perform a clean installation of Windows 10, you’re going to need a USB thumb drive with a minimum of 8GB and the Windows iso File. Luckily, Microsoft offers the Windows 10 iso file for free through the Media Creation Tool.
- Visit the Download Page Here
- Click on “Download Tool Now”
- Open the Media Creation Tool.
- Choose the option “Create Installation Media” and click Next.
- Choose the options that match the PC and click Next.
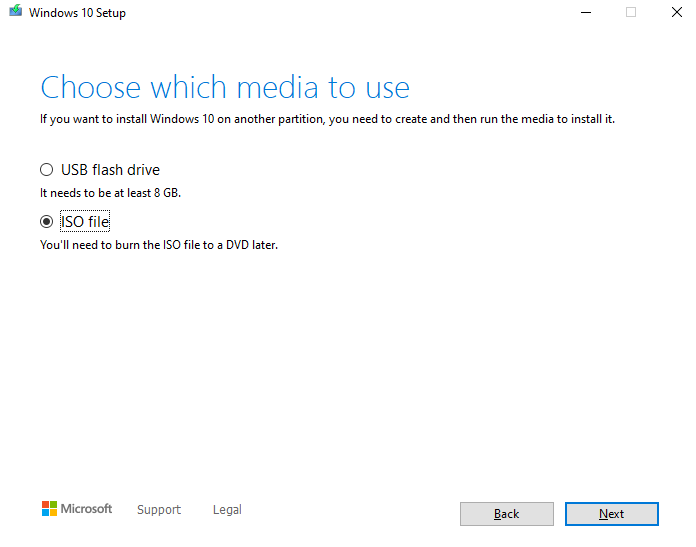
- Select the “ISO File” option and click Next. ( Clicking on the USB Flash drive will erase all data on it ).

- Choose a location to store the ISO file.
- Wait for the download and set up to complete.
Now the Media Creation Tool will download the Windows 10 ISO file that we will need to use to clean install Windows 10.
Download Drivers
If you are going to perform an offline installation of Windows, then it’s best to download the device drivers and essential software beforehand as some essential functions of the computer will not work without them. Alternatively, you can skip this step if you have a good internet connection.
Here is a list of manufacturer’s websites, where device drivers can be found.
Check the Partition Style
This is the most important step, you have to find out what type of partition scheme the computer uses.
To easily find out the partition scheme right-click the Start menu or press Windows Key + X and select “Disk Management”. Locate the disk in which you are going to install Windows and right-click it and select properties. Now, click the “Volumes” tab and now you can see if the disk is using a “Master Boot Record (MBR)” or “GUID Partition Table (GPT)”.

Creating the USB Installer
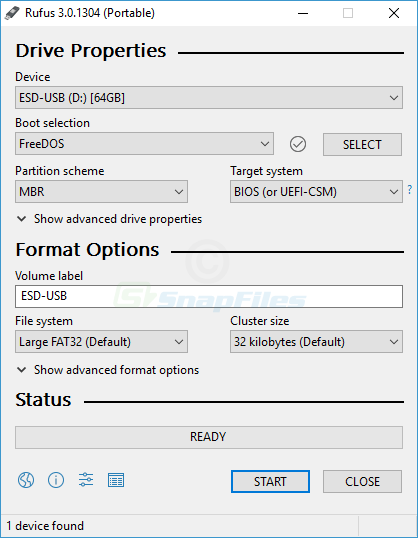
It’s better to use third-party tools to help you create bootable media but it is not officially supported by Microsoft. One of the most popular tools is Rufus. Rufus can create bootable USB faster than the installation media.
- Download Rufus from here
- Install the program and run it.
- Select the USB flash drive under the “Device” section.
- Under the “Boot selection” section, use the “select” option and locate the Windows 10 ISO file.
- Select the “Image option” as “Windows 10”.
- Now depending on which Partition scheme is on your disk choose either GPT or MBR.

- Change the “Volume Label” if you like (optional)
- Now when you’re ready click on “Start”.
Note that all the files on the USB drive will be erased.
Installation
There will be two parts of the installation process. The first one is the setup and the second is the out-of-the-box experience. Now let’s look at how to run both.
Windows 10 setup
Make sure that you’ve plugged in the USB drive that has the bootable installation in it.
Warning: This is a friendly reminder that this process will erase everything on the partition in which your operating system is located.
- Turn on your computer and press the “Boot” key. Refer here to the keys.
- Boot into the USB drive with the installation media.
- Click on “Next” and “Install Now”.
- Click on the “I don’t have a product key” option if you already have a licensed Windows on that system or if you are installing for the first time.
- Click on “Next”.
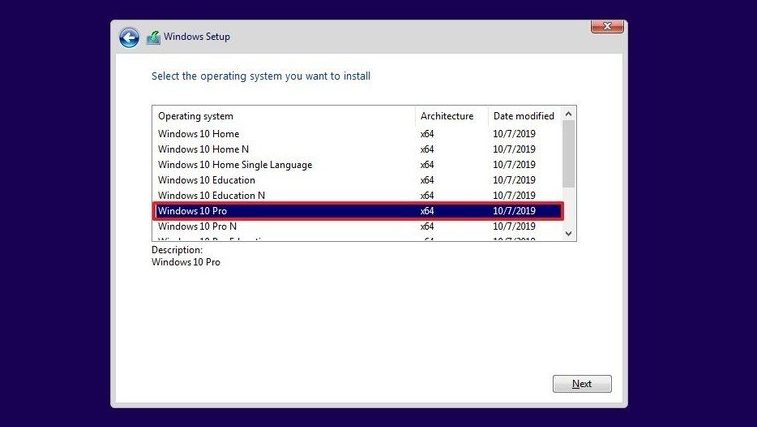
- Select the Edition of Windows you would like to install. Choose this based on the edition of your Product Key and click “Next”.

- Accept the license terms and click “Next”.
- Click on Custom Install Windows.
- Select the correct “Drive and Partition” and format it.
- Now make sure the correct partition is selected and click “Next”.
- Wait for the setup to complete, after this the computer will reboot and the next part of the installation will begin.
Windows Out-Of-The-Box Experience
Depending on the release of Windows some steps may vary. This is to make sure that Windows is personalized to your liking.
- Select your Region.
- Select your keyboard layout. Skip the second layout.
- choose Set up for personal use.
- Choose the “Offline account” option.
- Now type in any Username and Password you like. Although it is recommended not to use spaces while creating usernames.
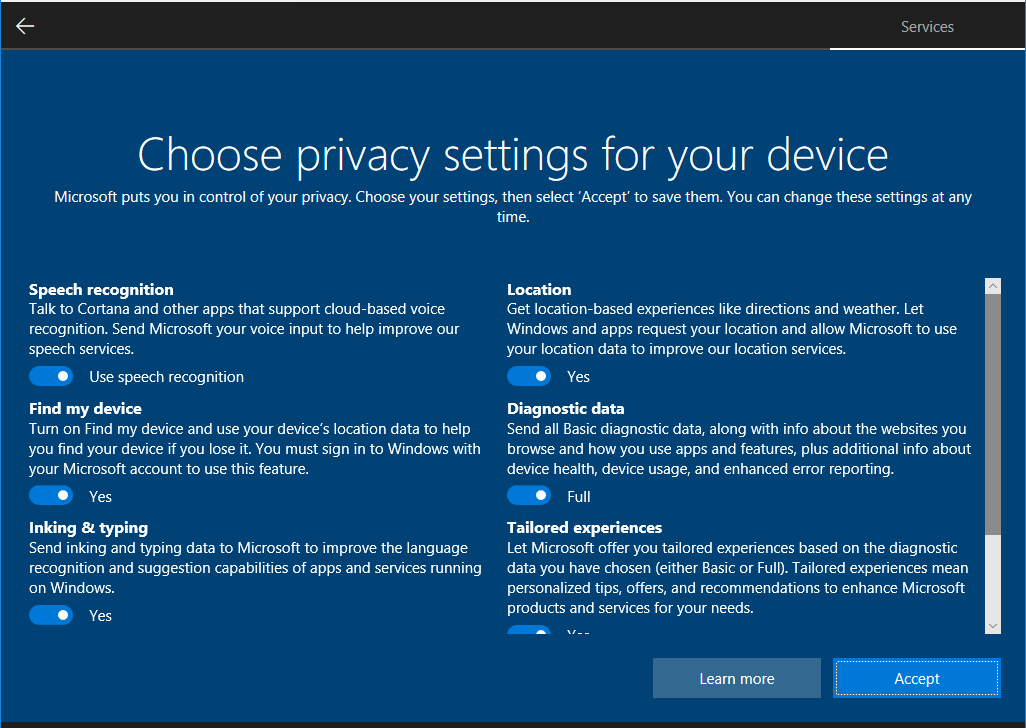
- Next comes optional services. If you don’t like to give Windows access to your data then you can choose “No” or “Skip” them.
- Now we come to Privacy settings and here you can choose what you’d like to allow. Once you’re done click “Accept”

- Now Windows will setup and once it is completed, the Desktop should appear.
Finalizing Set up
Make sure to activate Windows if you have a Key or else you can buy cheap keys online from reputed websites. If you already activated Windows on the computer before the clean install then, Windows should automatically detect your activation.
Now comes the most important part, Driver installation.
If you do not have an internet connection then you should install drivers that you already downloaded onto your USB drive or use what the manufacturer provided you.
If you have an internet connection then, we recommend using Third-party software such as Driver Booster. It simplifies searching for drivers by finding all the important drivers and installing them automatically.

- Download driver booster from here
- Install and Run the program.
- Click on “Scan” for the program to scan for all the devices on your computer.
- Once the scan is complete, click on the “Install” button
- Driver booster will prompt you to make a backup, This is optional.
- Now Driver booster will download and install all the drivers. Make sure to restart your computer afterward.
Now make sure to restore all your files and software programs and now you’re all set to go. Now you know how to perform a clean install of Windows. Do mention tell us if we had missed anything and give your suggestions in the comments down below.
#TeamMeshPie