
All might not require optimization on your system as some of you will have the latest tech or good specked system. High-end gaming PC is the most capable and versatile of all the gaming platforms, but PC gamers also have financial and upkeep costs that our console brethren don’t have to deal with. As your rig inevitably gets old, its performance will gradually fall off.
All hope isn’t lost, though. Before you drop hefty amounts of money on an entirely new gaming PC, there are several things you can try to keep your current setup chugging along a while longer.
Even if you have the latest hardware, you can make it work better and more efficiently with some minor tweaking.
In this blog for Windows 10 gamers, we’ll walk you through a few tips and tricks to optimize your system for gaming so you can have a better gaming experience. Even if you have the best CPU for gaming, this blog will be helpful to you to some extent.
Keep Your System & GPU Drivers Updated
This is your top priority. To keep your gaming PC working correctly and efficiently, you need to keep both your system and GPU drivers updated from time to time. Even if you have the best graphics card from the market, your games might crash or run sub-optimally without proper drivers installed/not updating the drivers.
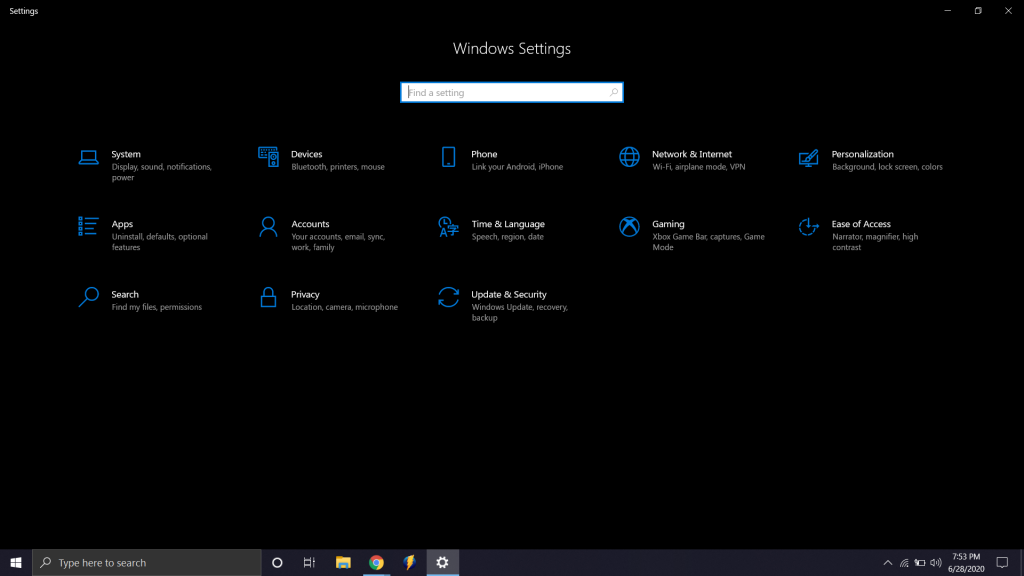
Windows 10 has made the work simpler for you to keep your drivers updated. It searches for recent updates and installs them every time you are connected to the internet. However, you can also manually check them by following these simple steps:
- Click on the Windows icon at the bottom left corner of the screen
- Click on the ‘Settings’ button
- Choose the ‘Update and security’ section on the bottom right
- Click on the ‘Windows Update’ tab on the left side of the menu
- Inside the menu, you can click on ‘check for updates’
- If there are any recent updates to install, do it
- After you are finished, reboot your computer
Here’s How to Update Your GPU Drivers
- The first step is to figure out your GPU’s brand and the exact model number (you can find the model of your GPU under the ‘Display Adapter’ tab within ‘System Information,’ which can be found easily by typing it into the search menu)
- Go to the manufacturer’s website and search for drivers of the specific GPU model (series)
Some GPU manufacturers (like NVIDIA) offer software (like GeForce Experience) that keeps your GPU drivers updated automatically - Download the latest driver and install it
- Restart your computer to complete the process.
This is the basic optimization you can do to improve your gaming experience in your Windows 10 system.
Use Game Mode
The game mode is there to optimize your entire system for gaming. While it’s turned on, it will stop unnecessary processes such as updates and will use the system’s resources in a more efficient way possible.
- Click on the windows icon at the bottom left corner of the screen
- Next, pick the ‘Settings’ option
- Click on ‘Game’ section under the settings menu
- On the left side of the list, click on ‘Game Mode’ tab
- Set the ‘Game Mode’ button to ON
You can also access game mode by pressing Windows+G. With the Windows Game Mode turned on, your gaming performance will be increased by 10-15%.
Use the Maximum Performance Power Plan
Although not as likely to produce significant improvements as most of our other suggestions, you can try to speed up your PC by setting the power plan for maximum performance. It will make your PC to use more available energy, but it will also increase performance.
- Enter the ‘Settings’ menu as in previous instructions
- Click on ‘System’ at the top left corner
- Choose ‘Power and Sleep’ tab on the left side
- Click on ‘Additional power settings’ on the right side of the menu
- Choose the ‘High Performance’ power plan
If you can’t find such an option, then choose ‘Create a Power Plan’ and create your own performance-oriented power plan according to your preferences.
If you’re using a laptop, this might not be such an excellent idea unless it’s plugged in. We’ve all heard about the infamous battery issues that modern gaming laptops have.
Optimization of Visual Effects Settings
If your system is older or slower, this will be a very effective way to improve performance while gaming. These steps will set your visual effects to reserve the computer’s resources for gaming:
- Open the search box and type ‘Advanced system settings’
- Under that menu, choose the ‘Advanced’ tab
- Within the ‘Performance’ box at the top, click on ‘Settings’
- Choose ‘Adjust for best performance’
- Click ‘Apply’
This method usually shows the need for upgrading your RAM. If you aren’t sure how much of RAM to buy or which one to buy, don’t worry Kingston has made the task simpler for you.
Prevent Auto-Updates on Steam
If you are that gamer, who prefers Steam to install and play games, know that certain settings can defer your gaming experience. If it is set to auto-update, Steam will download and update your games as soon as those updates are available which will affect the optimization of your system.
It will apply updates to your entire library. This can mean large downloads and memory usage for games you don’t even play. Also, downloading an update while you play a game will hog your computer’s resources and internet speed. To optimize Steam automatic downloads, follow these steps:
- Open Steam client
- Select ‘Settings’
- Select ‘Downloads’
- Uncheck the box ‘Allow downloads during gameplay’
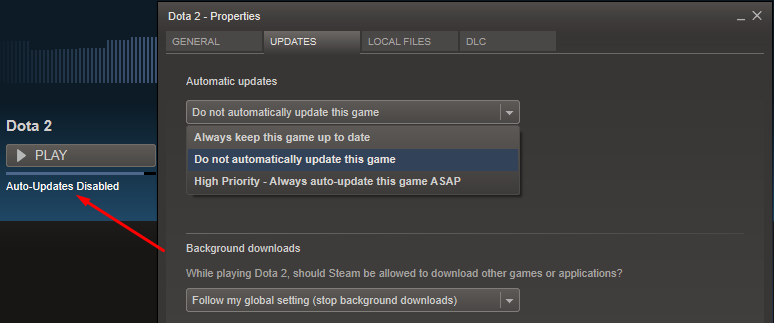
To prevent downloads for unused games:
- Open the ‘Library’ within Steam client
- Right-click on unused game
- Choose ‘Properties’
- Choose the ‘Updates’ tab
- Under the ‘Automatic updates’ menu, choose ‘Only update this game when I launch it’
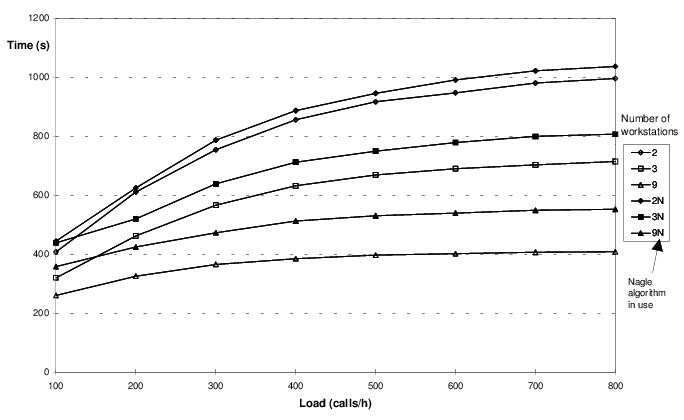
Disable Nagle’s Algorithm
This optimization only works for online gaming. Nagle’s Algorithm makes the network you’re using more efficient by reducing the number of data packages that are sent. This algorithm can create latency problems while gaming. Disabling it can smooth out your online gaming.
Nagle’s Algorithm is disabled through the Windows Registry. It’s essential to be very careful when following these steps:
- Type ‘Regedit’ inside the search box and open Windows Registry
- Copy the following path inside the address bar
“HKEY_LOCAL_MACHINE\SYSTEM\CurrentControlSet\Services\Tcpip\Parameters\Interfaces” - Find the correct file (on the left side of the window) by matching the IP address of ‘DhcpIPAddress’ file (on the right side of the window) with the IP address of your computer
- Once you have found the correct file, right-click on it, choose New, and DWORD 32-bi Value
- Create two of these
- Name one file ‘TcpAskFrequency’ and the other ‘TCPNoDelay’
- Double click on each and set their value to 1
These actions will disable Nagle’s Algorithm for you. If you run into trouble, just go back and set values of ‘TcpAskFrequency’ and ‘TCPNoDelay’ to 0.
Alternatively, upgrade your network by going for a good router for optimization for a better gaming experience.
Upgrade to SSD
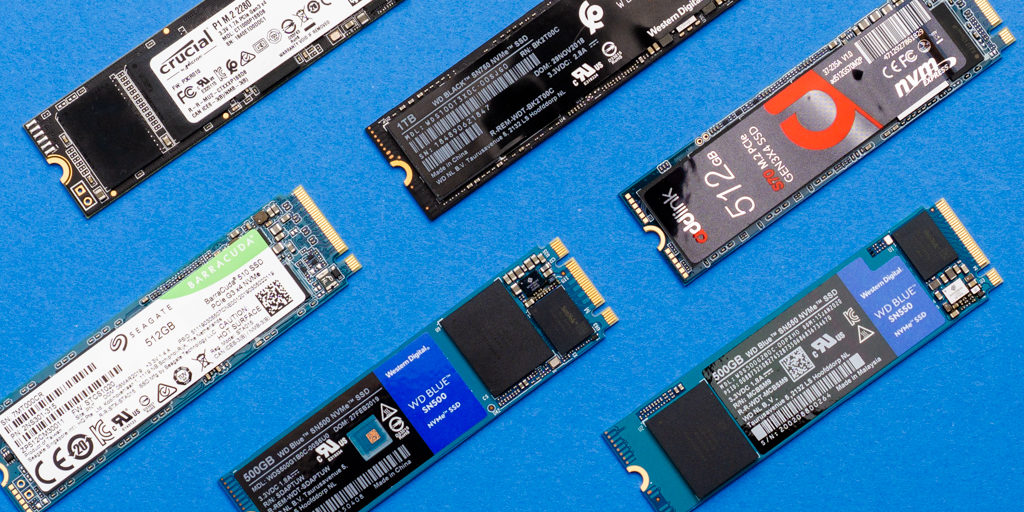
Although this is blog is geared toward Windows 10 OS optimization for a gaming experience, we still advise you to upgrade your hardware too. If you are currently using an HDD to store things, remember that upgrading to SSDs for gaming would have a greater impact on your optimization process.
If you have an SSD, make sure that you store your Windows 10 OS on the SSD and not on HDD, so that it retrieves data much faster.
Conclusion
If your PC can’t keep up with the outrageous demands of your favorite game or if you can’t afford any expensive hardware upgrades at the moment, you shouldn’t despair. Windows 10 is an awesome OS that supports a lot for gaming. Try these steps we showed above and make your optimization perfect for gaming.
Click here to read similar articles!