
This guide on how to record with OBS will cover everything right from the basics on recording a screen using OBS to recording meetings with OBS and the best settings to record screen in OBS, it’s all covered.
OBS (Open Broadcaster Software) is an open-source app for Windows, Mac, and Linux that is designed for recording & streaming purposes, both for the beginner and the professional levels. This app is designed with simplicity and targets all userbase right from basic users to professional YouTube Vloggers or streamers.
The best part about OBS is that it is absolutely free and has a wide range of options to record. It can literally record any source, be it an internal screen capture or an external device capture, OBS can do it all and record both video source & audio source simultaneously.
This becomes really useful for those people who want to record a zoom call or an important meeting or to capture moments that cannot be missed. With OBS, you can record anything on the screen like on-screen video or a specific window along with the internal audio and enhance it by adding an external source like a microphone to make it immersive in case you want to record your point of view as well. OBS gives you complete freedom to mess around with the quality, audio levels, and more (Don’t worry, we will cover them all 😉)
- Advertisement -
Why should you use OBS
As mentioned earlier, OBS being free software, it is really powerful and has lots of advantages over the other apps out there to record screens. With OBS, you can have multiple source audio and video capture. What this means is that if you are planning to record a meeting, you can add multiple audio captures to capture all commentators in a video conference, Google Meet calls, or Zoom calls. Apart from that, recording with OBS also can also help you capture audio from a game or a window. For example, if you are recording a YouTube Livestream, you can also capture the original audio from the video.
OBS also lets you add multiple video sources on a single screen, add different camera angles, graphics that appear with a hotkey, static images, and more to make your recording/stream look professional. You can also create multiple scenes for different scenarios like a static screen for introduction, then the main scene with different elements, and a scene for the outro. OBS also allows you to switch between scenes using hotkeys to make it more seamless and professional.
The best part about OBS is the integration with multiple platforms. With OBS, you can easily stream to famous platforms like YouTube, Twitch, Facebook, and more. This gives an opportunity for those who are planning to interact with their audience live on the internet.
How to setup OBS for recording
This simple step-by-step guide will help you setup OBS for recording anything.
Step 1: Download & Install OBS
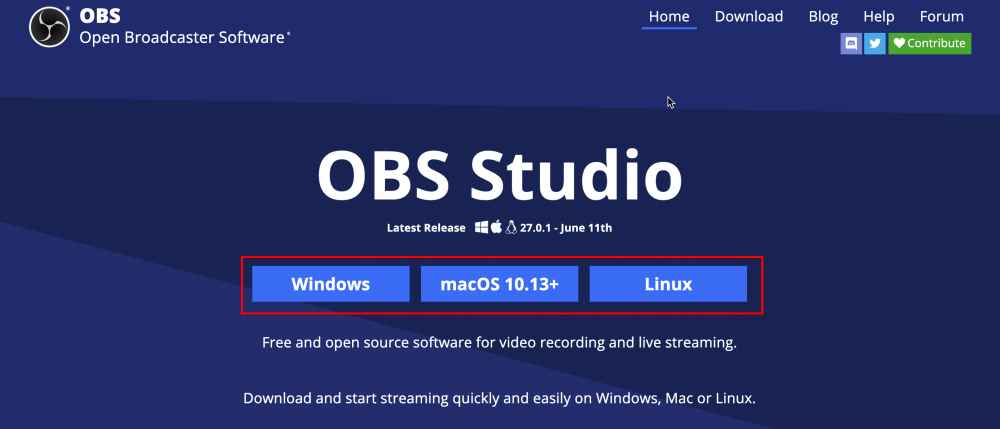
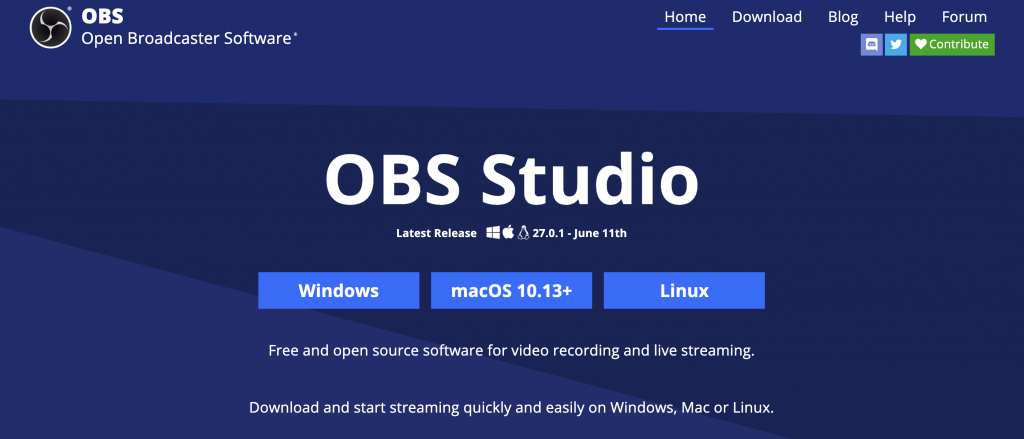
The first step to get started is to download and install OBS. You can download OBS from the official website obsproject.com by selecting the Operating system you use and clicking on the download button.
- Advertisement -
Step 2: Skip the auto setup
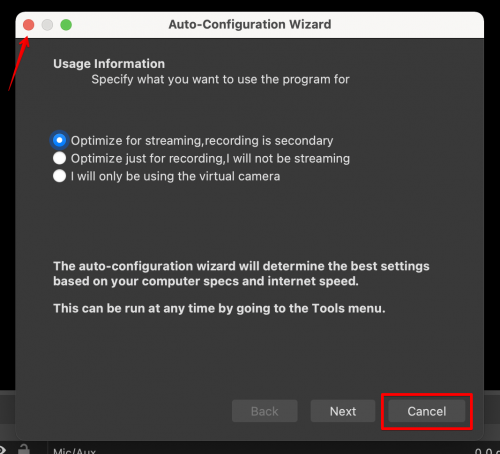
The auto setup is fine for quick use, but setting up things manually and spending the extra 2 minutes to setup can make things look better both for us and the audience.
Step 3: Add a new scene
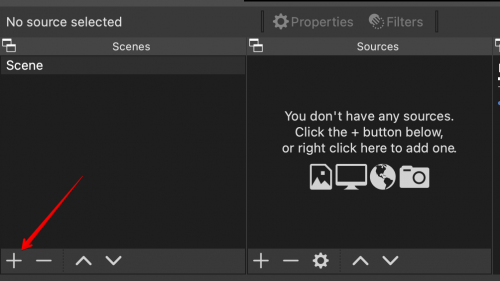
To add a new scene in OBS, click on the Plus (+) symbol on the bottom left corner and create a new scene. You can name it anything you want.
Here, you can have multiple scenes for different scenario. For example, if you want a scene with just your webcam you can create a separate scene and switch it with a hot key. Similarly, if you want a scene with a smaller camera along with your computer screen in the background, you can do it.
Note: Changing an element in one scene won’t affect the other scene.
- Advertisement -
Step 4: Add sources
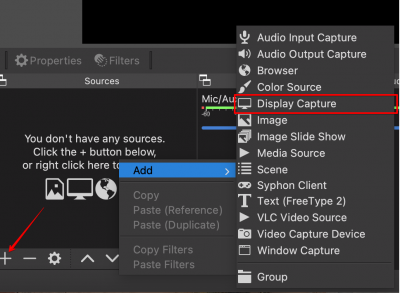
Now that you have created a new scene in OBS, the next step is to add a source to capture. To add a source in OBS, simply click on the Plus (+) symbol in the bottom left corner of the Sources tab and you will see a lot of different options to choose across.
In this guide, our goal is to record screen using OBS. So let’s proceed by adding ‘Display Capture‘ and now you can see your own display in the OBS preview window.
Note : If your screen is not visible, double click on Display Capture and select screen 0 which is your primary screen. In case you have additional display and you want to record that, select screen 1 which is your secondary display.
That’s pretty much it with regards to the basic setup of OBS to record screen. With this, you are ready to record your Zoom meetings or record gameplay using OBS. The next part of this article will guide you on how you can record your screen using OBS.
How to use OBS to record screen
With OBS, recording your screen is super simple. Now that you have done the basic setup of OBS, the next step is to configure the OBS settings and optimize it for recording the maximum quality.
Step 1: Configure Resolution
The basic step which most of the users miss out on is the resolution. By default, the OBS recording setting will be set on 720p30 (720p Dimensions at 30 frames per second) to change that, head over to the settings and click on the Video tab.
Under that tab, set the base (canvas) resolution to 1920 x 1080 and the output (canvas) resolution to 1920 x 1080. Use the Lanczos (Sharpened Scaling, 36 Samples) downscale filter and the fps set at 60.
| Base (Canvas) Resolution | 1920 x 1080 |
| Output (Canvas) Resolution | 1920 x 1080 |
| Downscale Filter | Lanczos (Sharpened Scaling, 36 Samples) |
| Common FPS values | 60 |
Step 2: Configure Recording & streaming settings
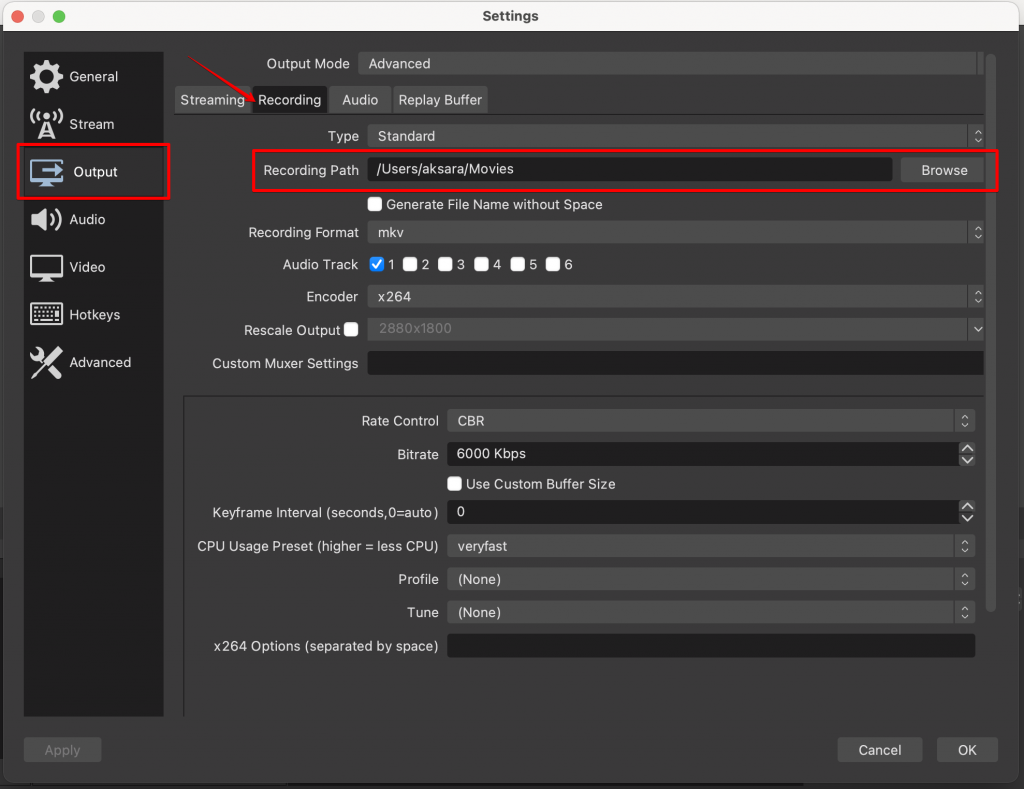
Changing these settings will allow you to record and stream at more bitrate. To configure the recording/streaming settings in OBS, open settings, and head over to the Output tab. Under this window, the first thing you need to change is the output mode from Simple to Advanced.
By changing the output mode in OBS, you will get even more options to mess around & configure with. But don’t worry, I will be guiding you through the best settings to record with OBS.
Best streaming settings for OBS 2021
The first thing you need to change is the Encoder.
If you are on a Mac OS machine, proceed with x264.
If you are on a Windows OS machine with a dedicated graphics card then use the following –
– Nvidia graphics card: NVENC new
– AMD graphics card: AMF (Advanced Media Framework)
The second thing you need to change is the Bitrate value.
Anywhere between 4000 to 8000 would be ideal for a user for recording their display or recording game using OBS.
Note: The higher the bitrate, the higher the sharpness or quality you will get. But the only downside to this is that using a higher bitrate will require more internet bandwidth and using a higher bitrate for recording will take up more space than normal/low bitrates.
The third thing to configure is the Keyframe interval.
This setting is changed mostly for streaming purposes. Most of the streaming platforms require 2 Keyframe intervals for a smooth stream, so changing that would make it easy if you are planning to stream.
The last thing to configure is the CPU usage preset.
This is purely experimental, you can run through all the settings once and optimize it. Changing the settings here will decide how much CPU % is used in OBS.
Higher settings = Higher CPU usage
But according to my usage, keeping the CPU usage preset on ‘Faster’ works just fine.
Best recording settings for OBS 2021
Setting up the best recording settings for OBS is super simple. Now that we have configured the stream settings, you can configure the recording settings by clicking on Settings > Output > Recording.
The type can be left to default which is Standard.
Step 3: Record screen using OBS
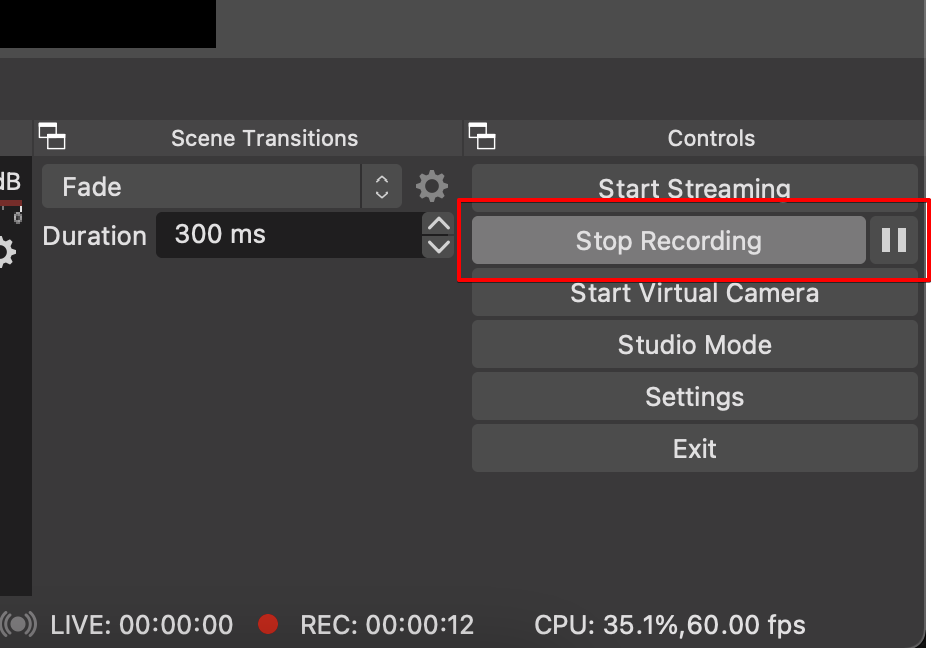
Now that the complete setup is done, it’s time to record the screen. To record your screen using OBS, simply click on the Start recording button, and boom, that’s it.
Where does OBS save recordings?
And if you are wondering about the OBS recording save location, by default it is
users/username/movies on a Mac OS and
C:/Users/username/videos on a windows computer.
Also check: Where does OBS save recordings
If you’re looking for a quick way to find how to see OBS recordings, simply click on File and click on Show Recordings. Here you can find all the recordings from the OBS.
If you want to change the OBS recording save location, head over to Settings > Output > Recordings > Recording Path and select a location where you want the OBS recordings to be saved.
So every time you click on Stop recording, this is the location where all the OBS recordings are saved.
How to add webcam to OBS
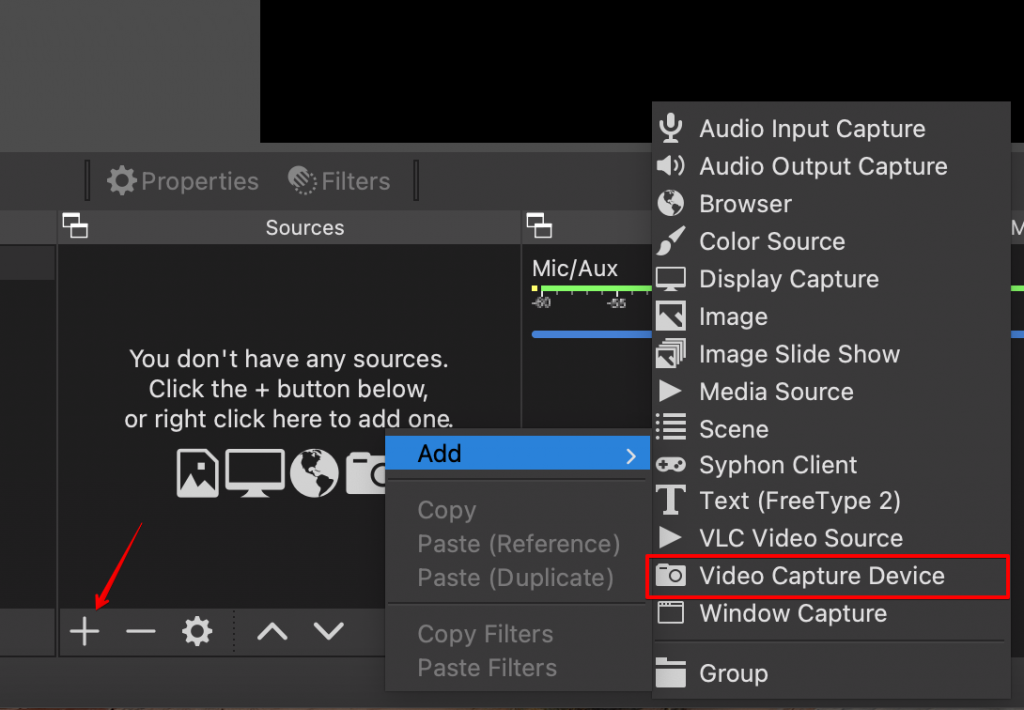
If you want to record a screen explaining something with you in it or if you want to stream your gameplay to different platforms with your facecam, then you would definitely need a webcam. To add a webcam to your OBS scene, simply add a new source.
To add a source to your OBS scene, click on the small plus (+) icon and click on Video Capture Device, and press on OK. You will be prompted with another pop-up (Properties for ‘Video Capture Device’) and in that tab, select your device by clicking on the dropdown and adding the webcam.
By default the webcam will be huge and will take up most of your screen, you can simply select a corner and drag it inwards to make the webcam small on OBS. Additionally, OBS also allows you to adjust or crop the webcam and make your overall scene look better.
How to pause recording on OBS
OBS Studio also has an option where you can pause a recording and resume it. This is for the people who like to keep different bits of a screen recording in a single file than recording multiple bits and putting them together.
To pause a recording, you have to start a recording first (duh 😜) and once you start a recording, you will see a small pause ⏸️ icon next to the Start recording button.
There are multiple scenarios on the internet where people don’t have a pause option in OBS studio. Here’s what you can do if the pause icon is not visible obs or your pause icon disappeared from your OBS app.
Go to Settings > Output > Recording.
Under the Recording tab, head over to the Encoder settings.
Right now, in the Encoder settings tab, you will be seeing this option : (Use Stream Encoder) and that’s the reason why the pause icon is not visible in OBS while you are recording a screen.
To get the pause button in OBS, change the encoder settings to a different one, it can be anything right from x264 to hardware encoding. Basically anything but the default option which is ‘(Use Stream Encoder)’ option.
How to make OBS record in MP4
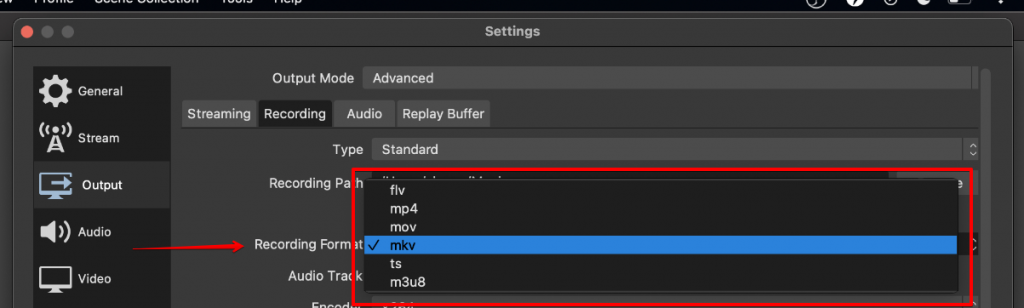
Undoubtedly, MP4 is one of the most commonly used formats for recording or editing videos. MP4 is well known for its wide support and accessibility compared to MKV. By default the OBS recordings are saved in MKV format but don’t worry, we can make OBS record and save in MP4 format in no time.
To make OBS record & save in MP4, head over to Settings > Output > Recording > Recording format. Under the Recording format drop-down, you can choose across various options like MP4, FLV, MKV, MOV, ts, m3u8 format.
If you have already recorded few clips using OBS in different formats, don’t worry. OBS also has a solution for it called the OBS Remux Recording.
What is Remux Recording?
OBS built-in feature Remux Recording is a feature that lets you convert file formats easily & effortlessly. You can convert select an incompatible file from your computer or from your OBS recording and remux it to MP4 format easily.
How to convert FLV to MP4 OBS
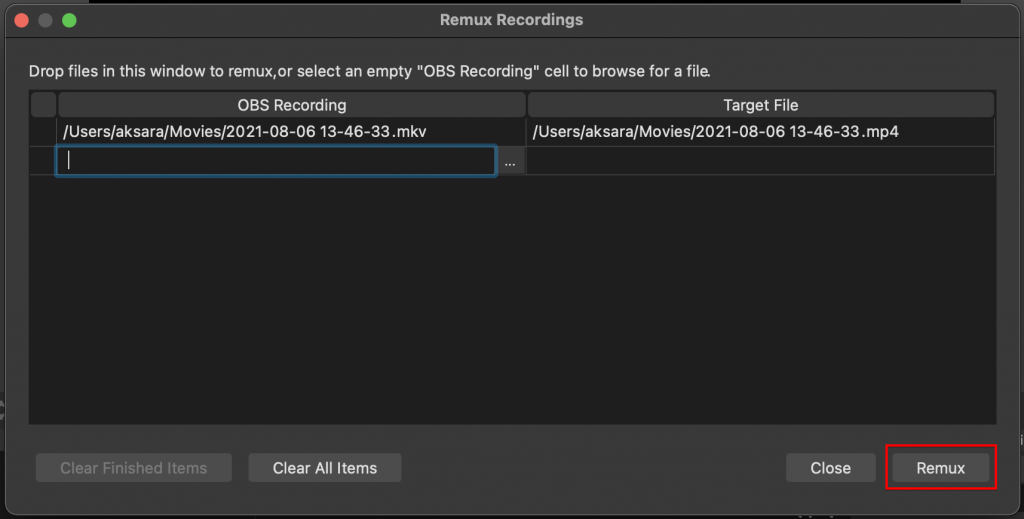
To Remux recordings using OBS, click on File > Remux Recordings.
A pop-up will appear with two columns, OBS Recordings, and Target File.
To convert FLV or MKV to MP4, select the OBS recording in the left column and click on Remux. By doing this, OBS converts the file from any format to MP4 and saves it in the same folder as the original file with a different format.
Are you ready to record using OBS Studio?
That’s pretty much it with the in-depth tutorial to record screen using OBS Studio. This is a very basic tutorial and is just the tip of the iceberg. There are 1000s of interesting things you can do with OBS Studio and the opportunity to get creative is wide open.
For example, you can use OBS as a virtual webcam to present during meetings, you can use OBS to manage a full-fledged studio with 10 or more cameras, you can use your smartphone to switch between scenes & control your OBS dashboard, and more.
If this tutorial was helpful for you, do share it with your friends and newbies who are getting into OBS. If you want to cover any specific topic about OBS, drop in the comments section and stay tuned for more OBS tutorials & guides.